Simple Fingerless Gloves for the Whole Family

So I got an email from a nice woman who gave me such rave reviews for my Simple Fingerless Gloves Pattern.  (Thank you so much by the way for that.)  It turns out everyone is really in love with it and I'm very happy that everyone has found some great use for them.  Anyway, the email was asking me how she could make these gloves for everyone in her family and that got me thinking.  I realized that others could really use this info as well and so I set out to make them in more sizes and post them here for everyone to enjoy!


Now, let me start out by saying that these patterns haven't been tested beyond the people I have in my family (My daughter is the size of a 7/8 year old and my son is 2), so if you get an end result that doesn't match up to what has been written here or you find a mistake, then please let me know!  :)  You can either comment below or send me an email.  I love hearing from people reading this blog and using my patterns, so please feel free to write me or even send me pictures. I might even post those pictures on the blog (with your permission of course).

So, lets get this show on the road!  I didn't make PDF files of these three this time, but I'm sure you can download the file from the women's pattern and jot down some notes.  Let's start with the men's pattern.

Just like the women's pattern, I used a worsted weight acrylic yarn and an H hook.  the gauge ended up being about 16 hdc to equal 4 inches.

Men's Simple Fingerless Gloves
fits adult males
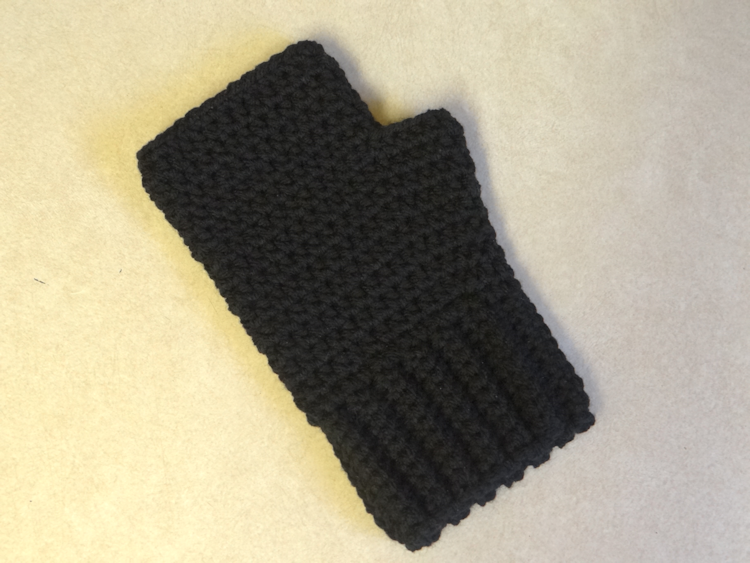

These patterns are worked continuously, making it easy to follow.  It's just one simple pattern for both hands, so they are interchangeable!  Make two.

Cuff
Ch 11
Rnd 1: sc in second ch from hook and in ch across, turn (10 sts)
Rnd 2: ch 1, sc in first sc, sc in back loops only of next 8 sc, sc in last sc, turn (10 sts)
Rnd 3-28: repeat rnd 2 (10 sts)
Slst or sc the two ends together to form a cuff. Begin the next round by crocheting along the edge of the cuff to start the hand portion of the glove.


Hand
Work in the round, joining at the end of every row and continuing in the same direction. The first stitch will always be in the same stitch as the join from the previous round.
Rnd 1: ch 1, sc 29 times along the edge, join to first sc (29 sts)
Rnd 2: ch 1, 2 hdc in first sc, hdc in each sc across, join to first hdc (30 sts)
Rnd 3: ch 1, hdc in each st around, join (30 sts)
Rnd 4: ch1, 2 hdc in first st, hdc in next 2 st, 2 hdc in next st, hdc in each st around, join (32 sts)
Rnd 5: ch 1, hdc in each st around, join (32 sts)
Rnd 6: ch 1, 2 hdc in first st, hdc in next 4 sts, 2 hdc in next st, hdc in each st around, join (34 sts)
Rnd 7: ch 1, hdc in each st around, join (34 sts)
Rnd 8: ch 1, 2 hdc in first st, hdc in next 7 sts, 2 hdc in next st, hdc in each st around, join (36 sts)
Rnd 9: ch 1, 2 hdc in first st, hdc in next 9 sts, 2 hdc in next st, hdc in each st around, join (38 sts)
Rnd 10: ch 1, hdc in first st, skip next 11 sts, hdc in next st and each st around, join 
Rnd 11-14: ch1, hdc around, join
Rnd 15: ch 1, sc around, join
Fasten Off and weave in end.

Kids Simple Fingerless Gloves
should fit ages 5-12


Cuff
Ch 9
Rnd 1: sc in second ch from hook and in ch across, turn (8 sts)
Rnd 2: ch 1, sc in first sc, sc in back loops only of next 6 sc, sc in last sc, turn (8 sts)
Rnd 3-20: repeat rnd 2 (8 sts)
Slst or sc the two ends together to form a cuff. Begin the next round by crocheting along the edge of the cuff to start the hand portion of the glove.


Hand
Work in the round, joining at the end of every row and continuing in the same direction. The first stitch will always be in the same stitch as the join from the previous round.
Rnd 1: ch 1, sc 21 times along the edge, join to first sc (21 sts)
Rnd 2: ch 1, 2 hdc in first sc, hdc in each sc across, join to first hdc (22 sts)
Rnd 3: ch 1, hdc in each st around, join (22 sts)
Rnd 4: ch1, 2 hdc in first st, hdc in next 2 st, 2 hdc in next st, hdc in each st around, join (24 sts)
Rnd 5: ch 1, hdc in each st around, join (24 sts)
Rnd 6: ch 1, 2 hdc in first st, hdc in next 4 sts, 2 hdc in next st, hdc in each st around, join (26 sts)
Rnd 7: ch 1, hdc in first st, skip next 6 sts, hdc in next st and each st around, join (20 sts)
Rnd 8-10: ch1, hdc around, join
Rnd 11: ch 1, sc around, join
Fasten Off and weave in end.

Toddler Simple Fingerless Gloves
should fit ages 2-4

Now these munchkins tend to have short chunky hands, so this one is worked a little differently, which is why I decided to post it last in the lineup.  :)

Cuff
Ch 7
Rnd 1: sc in second ch from hook and in ch across, turn (6 sts)
Rnd 2: ch 1, sc in first sc, sc in back loops only of next 4 sc, sc in last sc, turn (6 sts)
Rnd 3-24: repeat rnd 2 (6 sts)
Slst or sc the two ends together to form a cuff. Begin the next round by crocheting along the edge of the cuff to start the hand portion of the glove.

Hand
Work in the round, joining at the end of every row and continuing in the same direction. The first stitch will always be in the same stitch as the join from the previous round.
Rnd 1: ch 1, sc 25 times along the edge, join to first sc (25 sts)
Rnd 2: ch1, 2 hdc in first st, hdc in next 2 st, 2 hdc in next st, hdc in each st around, join (27 sts)
Rnd 3: ch 1, 2 hdc in first st, hdc in next 4 sts, 2 hdc in next st, hdc in each st around, join (29 sts)
Rnd 4: ch 1, hdc in each st around, join (29 sts)
Rnd 5: ch 1, hdc in first st, skip next 6 sts, hdc in next st and each st around, join (23 sts)
Rnd 6-7: ch1, hdc around, join
Rnd 8: ch 1, sc around, join
Fasten Off and weave in end.

ALL DONE! ENJOY YOUR SIMPLE FINGERLESS GLOVES FOR THE ENTIRE FAMILY!

Don't forget that you can find the Women's Simple Fingerless Gloves here.

I really hope you enjoy this pattern.  If you need any help then please feel free to leave a comment or email me at twolittlecs@gmail.com.  


TERMS :: You may sell whatever you make with my pattern, but please link back to my blog. Please DO NOT alter my pattern and repost it in any way, claiming it as your own.

Happy crocheting!

Chassity O.

All in One Wrap Flower

So I'm always on the lookout for flower patterns and something different and beautiful.  I love the look of those wrap flowers but hate having to sew them together.  Often times I just can't get them to wrap right and it's just a mess.  Also, I found them to be a little too bulky for a recent project I had.  I set out to create something of my own.  Here is a wrap flower that is fairly flat and it's worked all in one piece, no need to make a long spiral and no sewing here!  It works up pretty quick and is easy to make!  That's just the way I like it, LOL!

So for this project I used a worsted weight yarn and an H hook because that was what I was working with.  You are more than welcome to use whatever size yarn you have and the hook needed for that yarn.  My flower ended up being about 4 inches wide, so of course the smaller yarn and hook you use then the smaller the flower will be, while the larger they are then the larger the flower will be.

This pattern has been edited 08/10/2015 due to an error. Round 5 of the flower base creates too many loops and the the rest of the pattern then doesn't make sense. IF you download the PDF file please make sure to omit round 5 for a correct flower.


Note: Do not join rounds in the base, work in a continuous spiral.  You may want to mark the beginning of each round with a stitch marker.

Flower Base
Make a magic loop/ring.
Rnd 1: ch 1, work 8 hdc in loop. (8 hdc)
Rnd 2: in back loops only, work 2 hdc in each hdc around.  (16 hdc)
Rnd 3: in back loops only, (hdc, 2 hdc in next st) around.  (24 hdc)
Rnd 4: in back loops only, (hdc in next 2 sts, 2 hdc in next st) around.  (32 hdc)
Rnd 5: in back loops only, (hdc in next 3 sts, 2 hdc in next st) around.  (40 hdc)
Sc in next st and turn.
Don't fasten off.

Petal Loops
After you've turned your piece you should be looking at the side edge of it. Now you will slip stitch around the edge of your piece and in the front loops that were left unworked from the spiral. 
Ch 3, skip the sc and 1 hdc, slst in next st, (Ch 3, skip 2 hdc, slst in next loop) until you have 19 Ch3 spaces.
(Ch 2, skip 1 hdc, slst in next loop) around for 12 Ch2 spaces.
Turn.

Petals
In each of the 12 Ch2 spaces work (slst, hdc, 2 dc, hdc, slst).
In each of the 19 Ch3 spaces work (slst, hdc, 3 dc, hdc, slst).  At the end of the flower slst to the next stitch on the flower base.
Fasten Off and weave in ends.

That's it!  I hope it was easy to follow and if you have any questions then please feel free to leave them below so I can help you!  You are more than welcome to sell what you make from this pattern but please link to this blog.  :)

I've made a wrap flower square using this flower with double crochets. Check it out for a full photo tutorial of these flowers.

TERMS :: You may sell whatever you make with my pattern, but please link back to my blog. Please DO NOT alter my pattern and repost it in any way, claiming it as your own.

Happy crocheting!
Chassity O.

Simple Fingerless Gloves Pattern

I absolutely love fingerless gloves, and I love to whip up a quick and easy pair also, but I hadn't been able to find some that I really liked.  That got my mind whirling and I set out to create my own.  Others I had seen just weren't the shape that I wanted or used yarns I didn't have readily available and so on!  These are even so simple that you could certainly add anything to it to make them super cute and unique.  Why not add some appliques to the outside or a cute flower or bow at the cuff.  The possibilities are endless!  :D  So, here they are!

This pattern is not meant to be shared or resold with others in it's original or altered form.  Please direct people to this blog to get the goodness for themselves.  You are more than welcome to sell the items that you make, but please link back to this blog or my etsy shop!  :)


Simple Fingerless Gloves


Materials Needed:
• Worsted Weight Acrylic yarn of choice, I used I Love This Yarn from Hobby Lobby
• crochet hook size H (5.0 mm)

Guage is about 16 hdc = 4 inches.

This pattern is worked continuously, making it easy to follow.  It's just one simple pattern for both hands, so they are interchangeable!  Make two.


Cuff
Ch 11
Rnd 1: sc in second ch from hook and in ch across, turn (10 sts)
Rnd 2: ch 1, sc in first sc, sc in back loops only of next 8 sc, sc in last sc, turn (10 sts)
Rnd 3-24: repeat rnd 2 (10 sts)
Slst or sc the two ends together to form a cuff. Begin the next round by crocheting along the edge of the cuff to start the hand portion of the glove.
Hand
Work in the round, joining at the end of every row and continuing in the same direction. The first stitch will always be in the same stitch as the join from the previous round.
(pattern edited)
Rnd 1: ch 1, sc 25 times along the edge, join to first sc (25 sts)
Rnd 2: ch 1, 2 hdc in first sc, hdc in each sc across, join to first hdc (26 sts)
Rnd 3: ch 1, hdc in each st around, join (26 sts)
Rnd 4: ch1, 2 hdc in first st, hdc in next 2 st, 2 hdc in next st, hdc in each st around, join (28 sts)
Rnd 5: ch 1, hdc in each st around, join (28 sts)
Rnd 6: ch 1, 2 hdc in first st, hdc in next 4 sts, 2 hdc in next st, hdc in each st around, join (30 sts)
Rnd 7: ch 1, hdc in each st around, join (30 sts)
Rnd 8: ch 1, 2 hdc in first st, hdc in next 7 sts, 2 hdc in next st, hdc in each st around, join (32 sts)
Rnd 9: ch 1, hdc in first st, skip next 9 sts, hdc in next st and each st around, join (23 sts)
Rnd 10-13: ch1, hdc around, join
Rnd 14: ch 1, sc around, join
Fasten Off and weave in end.


ALL DONE! ENJOY YOUR SIMPLE FINGLERLESS GLOVES!

There's a new pattern available with additions for the entire family HERE.

TERMS :: You may sell whatever you make with my pattern, but please link back to my blog. Please DO NOT alter my pattern and repost it in any way, claiming it as your own.

Happy crocheting!
Chassity O.

Super Giveaway Winners

Yayy!  Congrats to everyone who won and thank you to everyone who entered and made this SUPER GIVEAWAY such a success!  It's been a lot of fun and I'm so very grateful for everyone who entered!  :D

And the winners are...


Obsessed with Nyan Cat

Have you ever heard of Nyan Cat?  Nyan Cat is a YouTube video sensation that merges a Japanese pop song with an adorably animated cartoon cat with the body of a pop-tart.  The best part is that the cat is flying through space leaving a rainbow trail behind it.  I know, it sounds crazy, but once you watch it it's like you instantly become hooked!  The video ranked number 5 on the list of most viewed YouTube videos in 2011.  I couldn't believe I hadn't seen this video sooner.  Here it is, so check it out!


I think it's by far the most adorable thing I've seen on the internet in a long time.  Once I started doing some digging, I ended up finding the Nyan Cat website, where I also found out that there are all sorts of Nyan Cat "flavors".  Basically they took the Nyan Cat idea to another level by creating holiday versions, other food varieties, and even some off the wall ones like Zombie Nyan Cat and the villainous Tac Nayn (which is Nyan Cat spelled backwards).

Now, the best part of this meme is the fan art that it has produced.  People have turned Nyan Cat into their personal plushies, paitings, jewelry, and so much more.  There are now even games available for iPhone and Android.  I was inspired by other crochet works I saw to create my own Nyan Cat scarf.  Isn't it adorable?


This was sorta my first attempt at it and I ran into a few speed bumps that I would probably change for the next one I make. I can't really tell if the fact that the eyes and legs being so big add to the charm of the scarf or if I should change that!?

I'm thinking that I might need to play around with it and see what I come up with, but I still love it regardless! I can't wait to wear it out and about tomorrow! This has of course sparked some other ideas in me that I can't wait to make, like maybe a matching hat, fingerless gloves, and of course an applique to put on just about EVERYTHING! Hehe!

Stay tuned for more Nyan Cat fun in the near future!  :D

Happy crocheting!
Chassity O.